You know how to code your game mechanics, but how do you make them feel satisfying? That sword swing might work functionally, but does it feel impactful and powerful?
In this guide, I'll show you how to improve the feel of an attack mechanic in a 2D game. We'll use Godot's built-in tools to add polish to sword attacks with layered visual effects, sound design, and animation techniques.
This video was made with Godot 3. The guide below has been rewritten for Godot 4.
Once you've prototyped your attack mechanics, it's time to juice them up. Even small details can make a big difference in how players experience game mechanics.
Here's an overview of what we'll cover:
Basic animation principles: I use anticipation to make the sword pull back before swinging, smearing to show motion blur during the attack, and easings to control the motion speed.
Layering visual effects: I add particle effects like snowflakes that continuously emit from the sword to reinforce the ice theme.
Extra sword polish: The sword sways gently up and down and rotates to point towards your mouse cursor.
Reactive enemies: When you hit an enemy, they get pushed back and spawn damage labels that fly up and fall down with gravity.
Time freeze: I briefly slow down the entire game when you land a hit.
While I'm using a sword attack as an example in this guide, the principles apply to any type of attack. You can use the same techniques for a sword, a gun, or a magic spell.
Nathan
Founder and teacher at GDQuest
What changed in Godot 4
Compared to the video above, Godot 4 brought many quality of life improvements but no fundamental changes to any of the techniques shown. Most notably, the particle system inspector has been completely reorganized, and the animation player is more intuitive to use.
There are three changes to GDScript syntax that you should be aware of:
Annotations over keywords: To make a property available in the editor, we now use the @export annotation instead of the export keyword. Also, we now use @onready instead of the onready keyword to initialize a variable when the node is added to the scene tree.
Signal connections: Signals and functions are now first-class citizens. We connect signals using objects, like area_entered.connect(_area_entered), instead of using plain strings like before: connect("area_entered", self, "_on_area_entered"). This gives you better autocompletion, error detection, and lets you connect to any function, including lambdas.
Await: The yield keyword is now await. You also do not use parentheses anymore: await signal_name.
Animating the sword attack
I use three animation techniques to make the sword animation readable although it's really fast (only a couple of frames): anticipation, smearing, and easing:
Anticipation, pulling back the sword before swinging forward
Smearing, creating a trail that follows the attack
Easings, a way to control the acceleration and deceleration of movement in animation
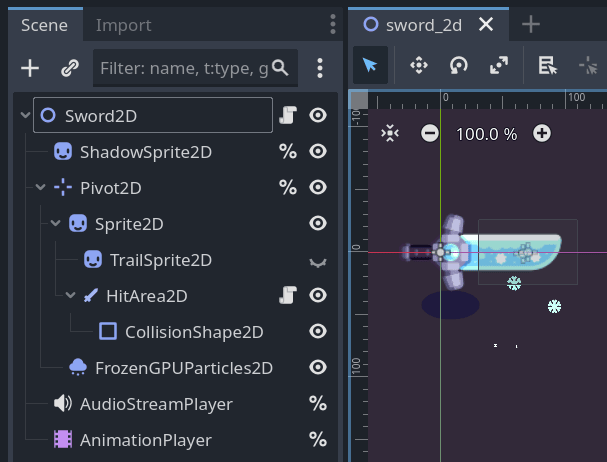
The pivot node and everything below it are the sword visuals and hit box. The pivot rotates to point toward the mouse cursor, and the sword swings around it when attacking.
The attack animation is stored in the AnimationPlayerAnimationPlayer node that rotates the Sprite2DSprite2D node to create the swinging motion. This allows turning the pivot independently of the sword swing animation.
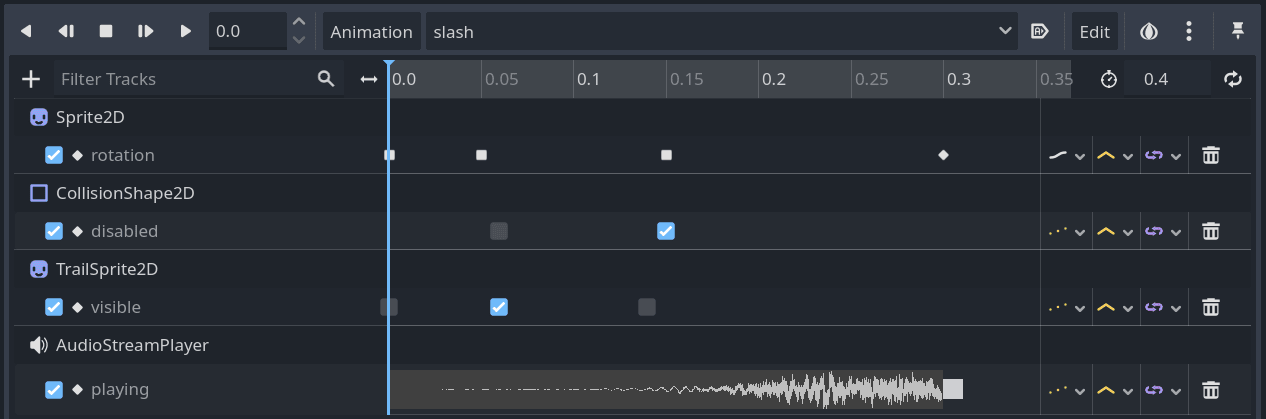
The attack animation
To give the sword some weight, I've added an anticipation animation before the attack: The sword moves back slightly for a frame before swinging forward.
In this clip I click and drag over the animation editor timeline to highlight the anticipation phase.
Be careful with anticipation! While it adds weight to your attacks, it also introduces a slight delay before the attack lands. If the anticipation phase is too long, players might feel like the controls are unresponsive.
Next, I've added a smear effect that follows the sword during the attack. This creates a sense of motion and makes the attack feel faster than it actually is.
I activate the smear only when the sword is swinging forward.
The smear effect here uses a single static sprite. I kept it pretty basic to show you that you don't need to make very complicated art.
Of course, a smear animated by hand by an artist would look better, but this simple approach already adds a lot to the feel of the attack.
Nathan
Founder and teacher at GDQuest
To tie it all together, I use easing to create more natural movement. Notice in the clip above how the sword slows down at the end of the swing.
Animating the enemy reaction
I apply the same animation principles to the enemy reaction. The enemy rotates with easing when hit, making it look like it's actually reacting to being struck. I also add a blink animation that briefly turns the sprite white to give clear visual feedback that the hit connected.
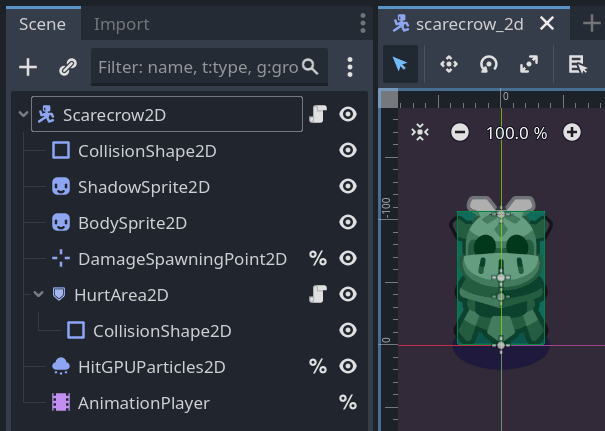
The enemy scene is this training dummy I called Scarecrow2D:
I've added particle effects that trigger on impact and a damage label that gets thrown around when the sword hits.
The animation itself is pretty basic, but effective:
The BodySprite2D rotates with uneven spacing, using easing to give it a more natural feel, like the dummy is actually reacting to being hit rather than just playing back a preset animation.
On top of that, I've added a blink animation that briefly turns the sprite white. This gives clear visual feedback to the player that their hit connected successfully.
I use a custom shader to make the sprite white:
shader_type canvas_item;uniformboolactive=false;voidfragment(){// Replaces all but alpha to white if active = true
COLOR =texture(TEXTURE, UV);if(active==true)
COLOR.rgb =vec3(1.0);}
All I do in the animation is toggle the active property of the shader on and off at appropriate times.
Layering particle effects
I add snowflake particles that emit from the sword continuously to reinforce the ice theme.
Godot 4's reworked particle system makes it much easier to get natural-looking results. The new ParticleProcessMaterialParticleProcessMaterial offers parameters that are more intuitive to understand and tweak.
There's a lot of parameters to experiment with. Here are two examples I used for the snowflake particles:
The snowflake texture starts small, gets gradually larger than shrinks back down before disappearing. The DisplayScaleScalemin and max parameters define the starting range of the scale, while I use the Scale Curve to affect how the scale changes over the particle's lifetime.
The same idea applies with Color CurvesColor ramp - I use it to vary each particle's color over their lifetime.
With all of these elements together, here's the full sword attack animation:
Notice that I also control the CollisionShape2DCollisionShape2D from the AnimationPlayerAnimationPlayer as its timing has to match when the hit happens.
Rotating and swaying the sword
The sword rotates to point toward the mouse cursor. I've also added a gentle swaying motion up and down to make the sword feel more alive.
The code uses look_at() to make the pivot node rotate toward the mouse position. For the swaying motion, I use a sine wave based on the current time to move the pivot up and down smoothly. Time.get_ticks_msec() returns the time elapsed since the game started, in milliseconds.
The last line in _physics_process() flips the pivot's vertical scale to prevent the sword from appearing upside down when the mouse is on the left side of the character. The sign() function returns 1 or -1 depending on whether the mouse is to the right or left.
Adding a knockback effect to the enemy
Finally, I apply a knockback effect that pushes the enemy away slightly when struck. I also spawn a damage label each time the enemy gets hit. To make it look more dynamic, I add gravity to the label.
Using a CharacterBody2DCharacterBody2D as the base node for the enemy makes it easy to implement the knockback effect. This is part of the enemy script:
In the knock_back() function, I first rotate the hit particles to face away from the sword's position. Then I calculate the _pushback_force by finding the direction from the sword to the enemy and multiplying it by 300 to set the knockback strength. It gives the enemy an impulse away from the hit.
In _physics_process(), I gradually reduce the _pushback_force every frame using lerp(). This creates a smooth deceleration where the enemy gets pushed back strongly at first and then slows down naturally.
I spawn a damage label each time the enemy takes damage. Here's the relevant part of the enemy script:
I set the label's global_position because I enabled the Top Level property on it (in the label's scene). This makes the label move independently of its parent, so it stays in place even when the enemy gets knocked back.
The damage label itself is a ControlControl node with physics applied to it. Here's its script:
The label starts with an upward velocity that has a random horizontal component. Each frame, gravity pulls it down, and I update its position based on the velocity. This is an easy way to give it a nice random arc when it spawns.
The final touch: freezing time
I very briefly slow down the entire game when the sword hits the enemy to make the hit feel harder.
This works by changing the Engine.time_scale for a split second. In the previous section, you saw the EventBus.enemy_hit signal being emitted whenever the enemy takes damage. I use this signal in the main scene to trigger a time freeze effect:
In this code, I multiply the freeze duration by the slowing factor because when time is slowed, the timer duration also needs to be multiplied to compensate for the slower passage of time.
In this project, I've exaggerated the freeze time a bit to make it noticeable, plus it happens on every hit. But you generally want to apply it just for one to several frames, or even only use this on critical hits or special situations like the player getting hit.