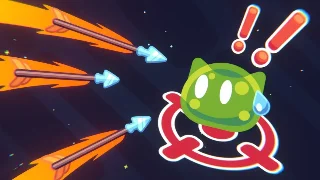
In this guide, you'll learn how to create ranged attacks that shoot projectiles toward your mouse cursor in 2D games. We'll cover both single-target attacks like arrows or bullets and area of effect (AoE) attacks that damage multiple enemies at once.
This video was made with Godot 3. The guide below has been rewritten for Godot 4.
In this study guide, you'll learn:
How to code ranged attacks that fire projectiles at the mouse position
How to expand ranged attacks with an AoE that damages all enemies within a certain radius
What changed in Godot 4 to make physics interactions easier and more flexible
What changed in Godot 4
This section is a quick reference for the video above, which was made with Godot 3. Here's what changed in Godot 4 compared to the video:
Variable keywords now use annotations: Godot 3's onready var is now @onready var, and export var has become @export var.
Signal connections: Instead of the string-based signal connection, node.connect("signal_name", self, "callback_function"), we can now write node.signal_name.connect(callback_function) as signals and functions are first-class citizens.
The rest of this guide uses Godot 4 syntax and conventions.
Ranged attack overview
Head to the download section to download the open-source demo and explore the code.
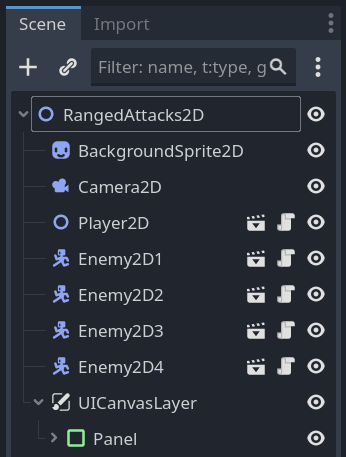
In this demo, we're solving a common problem: how to make projectiles that damage enemies when you click to attack. Here are the key files you'll find in the demo:
res://ranged_attacks_2d.tscn: The main demo scene where you can test shooting arrows and fireballs at enemies.
res://player_2d/player_2d.tscn: The player controller that handles spawning and shooting projectiles toward your mouse cursor.
res://weapons/arrow_2d.tscn: The arrow projectile that moves in a straight line and damages one enemy.
res://weapons/fireball_2d.tscn: The fireball projectile that explodes on impact and damages all enemies in a radius.
res://enemy.tscn: An enemy with a hurt box that detects when projectiles hit it.
Both projectiles move in a straight line toward where you clicked. The difference is in how they deal damage: the arrow damages the first enemy it touches, while the fireball spawns an area of effect explosion when it hits anything.
The enemies react to attacks with a hit animation to give you visual feedback.
The key code you'll learn from is in the projectile scripts, as that's where we handle movement, collision detection, and dealing damage. Let's first look at the arrow.
The arrow projectile
The arrow is our basic projectile that hits one enemy at a time. It flies toward your mouse position when you shoot. You'll see how to use this arrow as the base for the AoE fireball later.
Let's look at how it works.
We use two Area2DArea2D nodes to split up the work:
ImpactDetectorArea2D detects when the projectile hits something physical (like a wall or enemy).
HitArea2D is a hit box: a damage dealing area that enemies can detect and holds the damage value.
For the arrow, both collision shapes are the same size. Depending on the game and weapon, you'll need different sizes for these areas. You'll see that with the fireball down below.
The HitArea2D script sets up the collision layers and mask so enemies can detect it. It also stores the damage property that tells enemies how much health to lose when hit.
This activates the physics layer 2 and masks layer 3. Collision layers and masks use binary values under the hood, so layer 2 is binary number 0010 and layer 3 is 0100. The bits with 1 mean "active" or "detect," while bits with 0 mean "inactive" or "ignore."
The collision layer is the physics layer we reserve for hit boxes in this demo, while the collision mask determines which layers this area can detect (hurt boxes in our case).
The set_disabled() function is called in the main projectile script to toggle the hit box on and off.
Before we move on to the fireball, here's how we coded the arrow_2d.gd script:
The speed property controls how fast the arrow moves in pixels per second, and lifetime is how long the arrow exists before disappearing.
In _ready(), we connect the impact detector to destroy the arrow when it hits something. We also start a timer that will automatically destroy the arrow after the lifetime ends, even if it hasn't hit anything yet.
The top_level property is important here. When set to true, it makes the arrow independent from its parent node. Without this, the arrow would rotate and move along with the player. We then use look_at() to rotate the arrow sprite to face the direction it's traveling. It moves in a straight line so we just need to point it in the right direction once.
The _physics_process() function moves the arrow every frame by updating its position based on the direction vector, speed, and delta time.
Finally, _on_impact_detector_area_body_entered() is called when the arrow collides with something. For the basic arrow, we destroy it with queue_free(). You can override this function in child classes to add different behaviors, like the explosion we'll see with the fireball.
Next let's look at the fireball script res://weapons/fireball_2d.gd. It extends this class and adds the area of effect explosion on top.
Extending the arrow for area of effect
The first thing you'll notice in res://weapons/fireball_2d.tscn is that the two Area2DArea2D nodes have different collision shapes. We need HitArea2D to be much larger to cover the explosion radius and hit multiple enemies.
We start with HitArea2D disabled. If we left it enabled, the fireball would damage the first enemy it touches without exploding first. Instead, we use ImpactDetectorArea2D to detect when the fireball hits something and then trigger the explosion.
When the fireball hits something, we override the arrow's impact function to create an explosion. Here's what happens step by step.
First, we create a short timer that will disable the hit area after 0.1 seconds. During this brief window, any enemies within the explosion radius will get hit. We use a lambda function here to disable the hit area when the timer runs out.
Next, we stop the fireball from moving by setting its speed to zero. You could also call set_physics_process(false) to achieve the same result. Then we hide the fireball sprite and start the particle effect to show the explosion visually.
The important part is that we enable the hit area with set_disabled(false). We start with this area disabled in the scene. When we enable it, all enemies currently inside the radius will detect it and take damage.
Finally, the last line starts the timer to destroy the fireball after 0.6 seconds. It's to give enough time for the explosion effect to play before removing the node.
Import the zip file in Godot 4.5 or later to explore the code and see how everything works together. Feel free to modify the projectiles or create your own variants with different behaviors!
updates / code patches
This demo was originally made with Godot 3 and was updated to Godot 4.5. Suggest an update.