Raycasts are one of the most versatile tools in a game developer's toolbox, and you'll find yourself using them in many situations.
A raycast is an invisible line that detects and reports physics objects it hits. That's it! Despite this simplicity, raycasts are powerful in practice. You can use them to create lines of sight, handle ground detection, implement weapons, and much more.
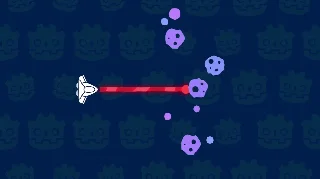
This animation illustrates a raycast using an arrow that turns red when it detects a collision with the game world.
What raycasts are and how they work in both 2D and 3D
How to set up raycast nodes in Godot
How to use raycasts to detect collisions and gather information about them
What some concrete use cases for raycasts are
What is a raycast?
A raycast is an invisible line with a direction and a limited length. It checks for collisions with physics objects along its path and gives you information about the first object it hits.
A raycast is much like a laser pointer. It travels in a straight line until it hits something, and then it tells you what it hit and exactly where the collision happened.
When a raycast hits something, it reports:
The physics node it collided with
The position of the collision in global coordinates
The surface normal at the collision point
You can use this information to create all sorts of gameplay mechanics: from spawning an impact visual effect where a bullet hits a wall to reflecting a beam of light that lands on a mirror.
Setting up raycast nodes in Godot
Godot has two nodes for raycasting in 2D and 3D games, respectively:
RayCast2DRayCast2D for 2D games
RayCast3DRayCast3D for 3D games
Both nodes work similarly. The most important property of a raycast node is target_position, which defines:
The direction the ray points in
How far it extends
In 2D, this is a Vector2Vector2, while in 3D it's a Vector3Vector3 value.
The start position of the ray is controlled by the node's position in the scene, and the target_position property is relative to this starting point.
By default, raycasts are enabled and check for collisions on every physics update automatically. You can turn them off by changing the Enabled property and call the force_raycast_update() function to control exactly when the ray updates. This gives you more control over performance and precision.
Also, by default:
Raycast nodes are set to collide with physics bodies but not areas. You can change this in the Inspector by expanding the Collide With section.
They ignore their parent node. This means that if you place a raycast as a child of a CharacterBody2D, it will not be reported, but other nodes in the same scene may be detected by the ray.
Using raycasts in code
Let's look at an example of setting up and using a raycast in 2D where we make the ray point 500 pixels downward:
There are four important raycast functions in this code:
is_colliding(): Returns true if the raycast is currently colliding with something. Use it to check if the raycast hit something before trying to get the collision information.
get_collision_point(): Returns the position of the collision in global coordinates.
get_collision_normal(): Returns the surface normal of the surface at the collision point.
get_collider(): Returns the physics body or area that was hit by the raycast.
Now, here's the 3D equivalent. In this example, we point the ray forward (remember that the negative Z-axis is the forward direction in Godot):
Here are some of the most common ways raycasts are used in games:
Line of sight: Raycasts can check if one game object can "see" another by casting a ray between them. Useful for enemy AI to detect if the player is visible or if obstacles are in the way.
Ground detection: Point a raycast downward from a character to check if they're standing on solid ground. You can place the ray at the character's feet and check if it collides with the ground.
Instant-hit weapons: For laser guns, bullets, or other "hitscan" weapons, we use raycasts to check what was hit. Actually, this is even used for projectile weapons to avoid issues like tunneling.
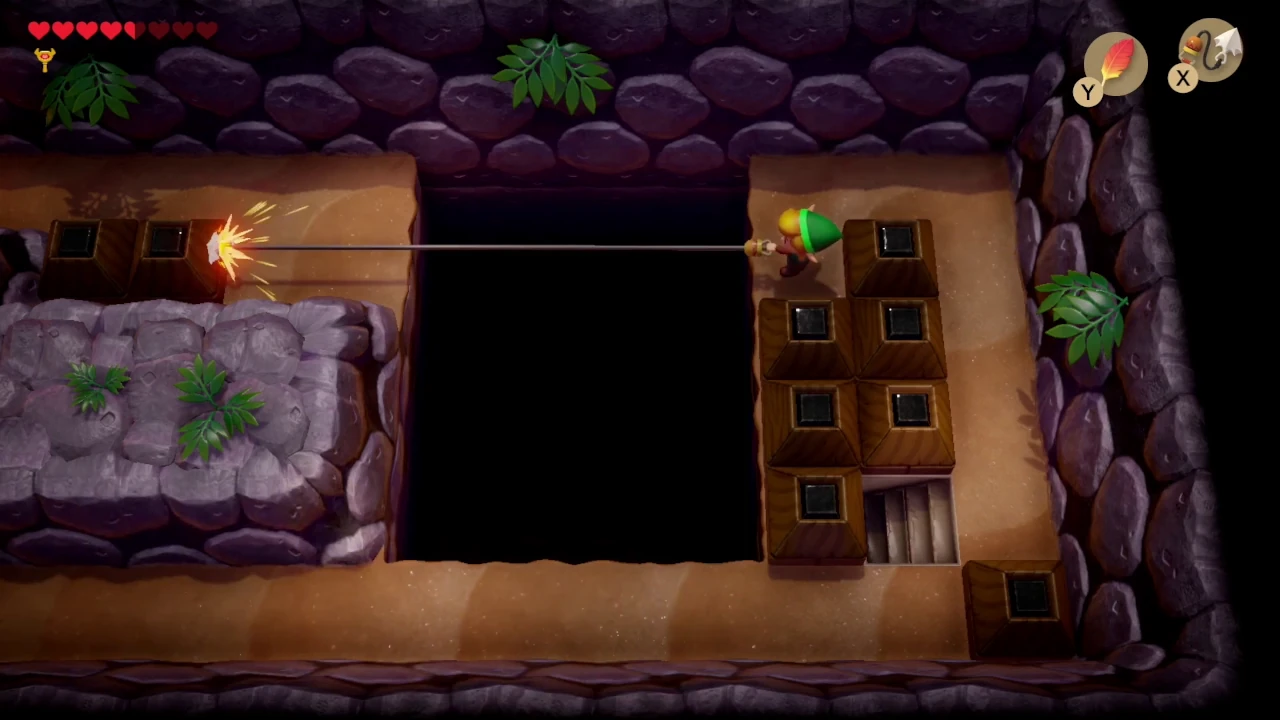
Grappling hooks: You can use a raycast to find a valid surface to attach a grappling hook to.
This grappling hook mechanic from The Legend Of Zelda: Link's Awakening could be using raycasts to find a valid surface to attach to.