Tactical RPG: Grid Movement, Pathfinding, and Unit Selection
In this free tutorial, you will build a complete movement system for a tactical RPG game in Godot, step by step.
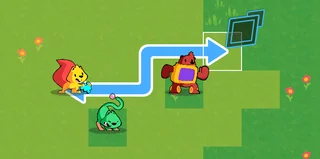
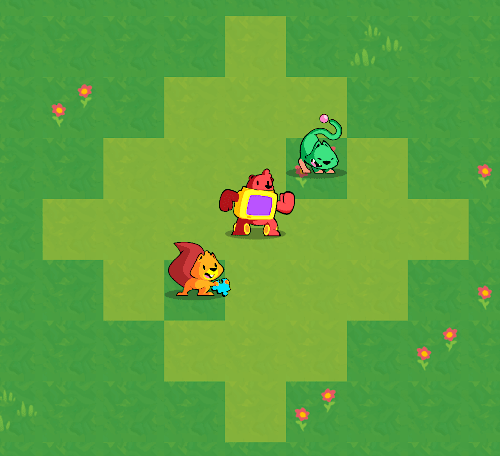
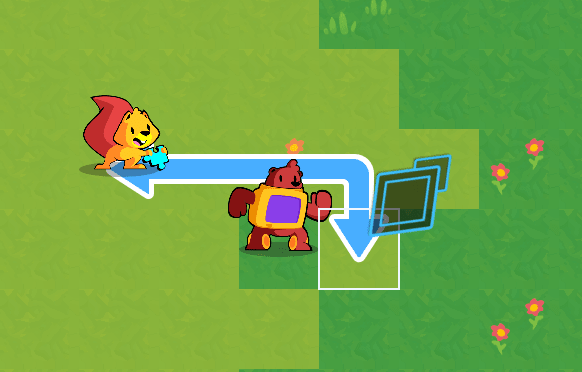
Tactical RPGs like Fire Emblem or Final Fantasy Tactics have units that move on a grid. When you select a unit, the game highlights the cells it can reach, draws a path as you move your cursor, and then walks the unit smoothly to its target. This tutorial teaches you how to build all of that from scratch in Godot 3.
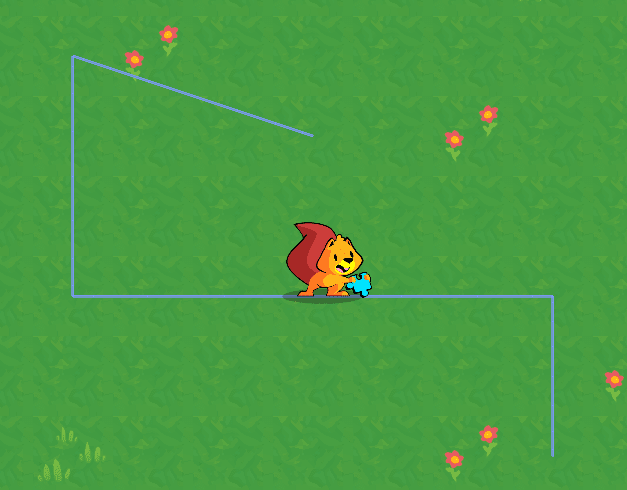
Here is what you will make by the end:
A Grid data structure that converts between pixel coordinates and grid coordinates, and that everything else in the project depends on.
A Cursor the player can move across grid cells to select and move units.
A Unit scene with a smooth walking animation and a blinking selection effect.
A PathFinder that uses the AStar algorithm to find the best path between two cells, taking obstacles into account.
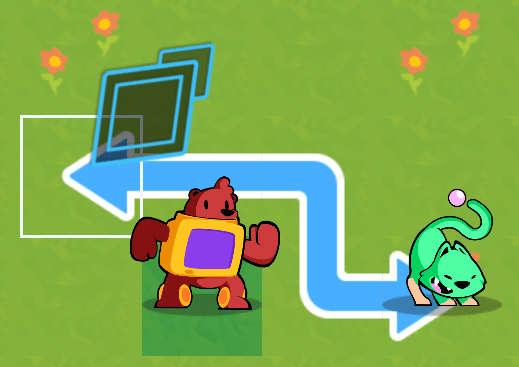
A UnitPath that draws the planned path on screen as you move the cursor, like in Fire Emblem.
A UnitOverlay that highlights all the cells a selected unit can reach.
A GameBoard that manages all units on the grid, prevents two units from occupying the same cell, and coordinates selection and movement.
The series also covers a flood fill algorithm to calculate which cells a unit can walk to based on its movement range.
Let's get started!
Nathan
Founder and teacher at GDQuest
Handling grid interactions
There are two main ways to handle grid movement and interactions in an engine like Godot:
Relying on the physics engine. In particular, areas and ray casts.
Using an object that represents the game board and manages what's on it.
Either can work well.
The first approach allows you to encapsulate many features on the pawns or units that move on the grid. Units can detect each-other with areas and ray casts, and they can directly interact with one another. It's quite convenient.
However, that physics-based approach can have its limitations, depending on the game: if multiple units can move simultaneously, two might move to the same target cell, causing a conflict. You end up needing to block cells when a unit starts to move using invisible collision shapes.
Also, in a tactical-RPG like this one, you still need a way to find the path a unit can walk. For that, you need an object that knows about all the units and other obstacles on the grid.
In other words, in our case, using the physics-based approach would still require an object to represent and keep track of what's on the game board.
That's why we'll use the second approach. It consists of letting an object represent and not only track but also manage the game board. That object knows where every unit is and moves them. With this model, any item on the grid becomes like a lifeless pawn rather than an independent entity.
Code structure
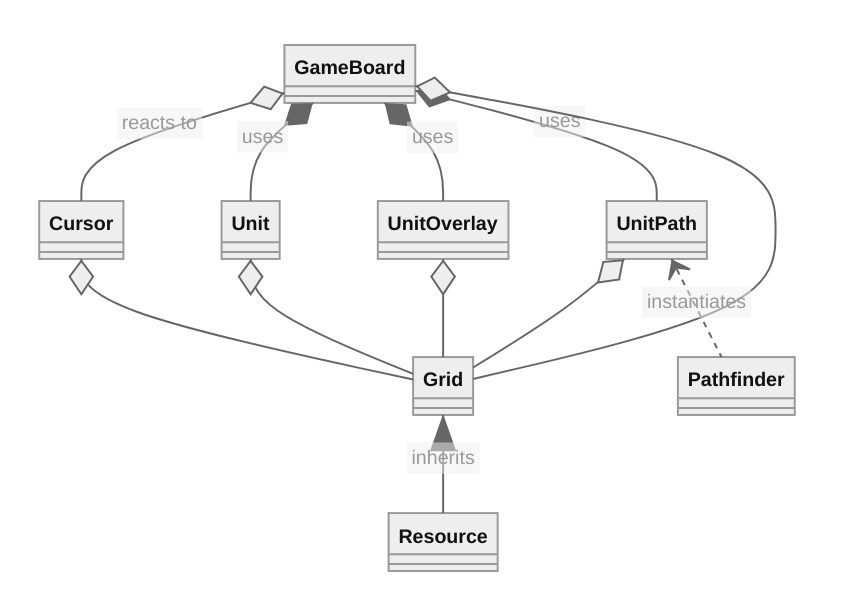
Here the way we're going to structure our code and an overview of what you'll build in the next lessons.
As mentioned before, we'll use a single node to manage interactions between units, and more: the GameBoard. It's going to tell units to move and generally handle "collisions", preventing you from moving a unit to an occupied grid cell.
As usual with our projects, we favor composition: you could reuse most scripts and systems from this project in another as they don't have strict dependencies on one another, except for the GameBoard.
Let's briefly go through each component's responsibility.
The Cursor is the player's cursor, a selection tool you can move across grid cells and use to select and move units.
Unit represents one pawn on the game board. It only handles a unit's visual aspect: animating and moving smoothly around the board. It's the GameBoard that handles actual movement behind the scenes.
UnitOverlay draws the cells a given unit can walk to when it's selected.
UnitPath displays the path a unit will move based on how the player moves their cursor after selecting a unit. It's inspired by Fire Emblem games.
The PathFinder finds the best available path for the unit to walk to a target position, using the AStar algorithm. The UnitPath uses it to draw the path the node found.
Finally, the Grid is a class that extends Godot's built-in Resource type. It represents the game's grid and provides useful functions to convert coordinates from and to grid space.
It's the first element we're going to code in this series, as everything else depends on it.
We will then code in the order of the dependencies, starting with everything the game board needs and end the series with it.
See you in the next lesson, where you'll get to code the Grid and learn why it's a resource.
The Grid
In a game like a turn-based tactical RPG, many actions take place on a grid.
Units have to move to the middle of cells, the player's cursor has to move along the grid, and so on. In our demo, five classes will need access to the grid's data and helper functions, as we saw in the introduction.
In Godot, an option to give many objects access to another is to make the Grid an Autoload (singleton). That way, every script in the codebase could access it.
However, you don't need everything in the game to access the Grid: only five classes need it. In our demo, which focuses on movement, it happens to be all the scenes we'll code. But in a complete game project, this number won't change.
There is an excellent alternative to using a singleton in Godot: using a resource.
Like singletons, many nodes can share access to a given resource. Unlike singletons, only the nodes that explicitly hold a reference to a resource can access it.
What's the point, if you can use a singleton instead?
This forces you to be deliberate about giving nodes access to the grid: you must define a dedicated variable in their script. We'll use exported variables to do so.
Using a "less convenient" option removes the temptation of using the singleton in unintended ways and coupling it to more parts of the game than needed.
If you're really careful and intentional about how you use singletons and prefer their convenience, you may use them instead.
However, when you create a singleton, as anything can access it, any bug that involves it can be anywhere in your codebase.
I keep seeing developers use singletons in fragile ways. People access them in illogical places, adding unnecessary coupling, because it's the easiest thing to do at a given point in time. Or they mutate the singleton's state directly from various places, making their code bug-prone.
And not only beginners do that: I've seen professionals use singletons carelessly many times over. They end up having to rewrite code late in a project's lifecycle painfully.
The advantages of a resource
Our Grid will extend the built-in Resource type. This will allow us to save it as a file in the FileSystem tab and to attach it directly to the nodes that need it in the Inspector.
I mentioned that with a resource, every reference to the grid will point to the same instance in memory. Changing the grid's size in one place will update the data for all other nodes.
You don't have to be afraid of freeing any node that has a reference to the grid either. This is perfectly supported.
Creating the grid script
Let's get coding. You can find a start project on the Tactical RPG movement repository. It contains the sprites we'll use in this series.
To download it:
Click the link above.
Click the green Code button, then click Download ZIP.
Navigate to the downloaded .zip file and extract it.
Import the start-project/ directory in Godot.
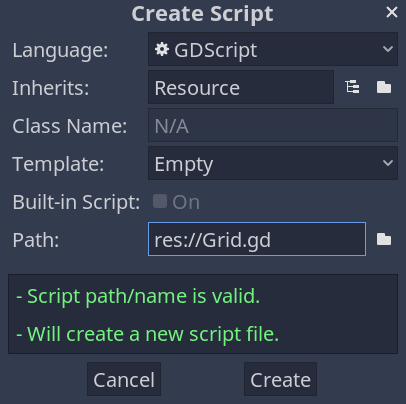
Right-click on the FileSystem tab and create a new script where we'll define our Grid class. Name it Grid.gd and make it extend Resource.
## Represents a grid with its size, the size of each cell in pixels, and some helper functions to## calculate and convert coordinates.## It's meant to be shared between game objects that need access to those values.class_name Grid
extendsResource## The grid's size in rows and columns.
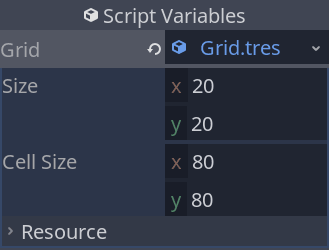
export var size :=Vector2(20,20)## The size of a cell in pixels.
export var cell_size :=Vector2(80,80)## Half of ``cell_size``.## We will use this to calculate the center of a grid cell in pixels, on the screen.## That's how we can place units in the center of a cell.var _half_cell_size = cell_size /2## Returns the position of a cell's center in pixels.## We'll place units and have them move through cells using this function.funccalculate_map_position(grid_position:Vector2)->Vector2:return grid_position * cell_size + _half_cell_size
## Returns the coordinates of the cell on the grid given a position on the map.## This is the complementary of `calculate_map_position()` above.## When designing a level, you'll place units visually in the editor. We'll use this function to find## the grid coordinates they're placed on, and call `calculate_map_position()` to snap them to the## cell's center.funccalculate_grid_coordinates(map_position:Vector2)->Vector2:return(map_position / cell_size).floor()## Returns true if the `cell_coordinates` are within the grid.## This method and the following one allow us to ensure the cursor or units can never go past the## map's limit.funcis_within_bounds(cell_coordinates:Vector2)->bool:var out := cell_coordinates.x >=0and cell_coordinates.x < size.x
return out and cell_coordinates.y >=0and cell_coordinates.y < size.y
## Makes the `grid_position` fit within the grid's bounds.## This is a clamp function designed specifically for our grid coordinates.## The Vector2 class comes with its `Vector2.clamp()` method, but it doesn't work the same way: it## limits the vector's length instead of clamping each of the vector's components individually.## That's why we need to code a new method.funcclamp(grid_position:Vector2)->Vector2:var out := grid_position
out.x =clamp(out.x,0, size.x -1.0)
out.y =clamp(out.y,0, size.y -1.0)return out
## Given Vector2 coordinates, calculates and returns the corresponding integer index. You can use## this function to convert 2D coordinates to a 1D array's indices.#### There are two cases where you need to convert coordinates like so:## 1. We'll need it for the AStar algorithm, which requires a unique index for each point on the## graph it uses to find a path.## 2. You can use it for performance. More on that below.funcas_index(cell:Vector2)->int:returnint(cell.x + size.x * cell.y)
You can use Grid.as_index() to pre-allocate and index a one-dimensional array representing a 2D grid. Depending on your game's needs, you can store your game board's state using an array, including all obstacles.
There are two advantages to doing that:
One-dimensional arrays are faster to iterate over and to index than two-dimensional arrays in GDScript.
If you use AStar pathfinding, you can work with the same indices everywhere in your game.
You'd have a one-dimensional array representing your grid's state and an AStar2D instance using the same indices. We won't be using such an array in this series. Instead, we'll use a dictionary to keep track of units conveniently, as you'll see when we work on the GameBoard.
However, in games with large maps, using a 1D array along with the AStar pathfinding can allow you to update the AStar graph fast whenever a unit moves or an obstacle disappears, at the cost of a little more code complexity, maybe.
Creating the grid resource
Let's create the resource file we'll attach to our nodes in future lessons. It'll define the grid's base properties.
Right-click in the FileSystem tab to create a New Resource.... And create a resource of type "Grid". I've named it Grid.tres.
The resource opens in the Inspector. You can leave the default values we defined in the script.
In the next part, we will code a simple unit and put the grid resource to use.
Creating the Unit
In this lesson, we'll create the unit, another core building block of the movement system.
The unit will only handle the visuals and the movement of a pawn on the game board.
This will allow us to test it even though we don't have the rest of the systems implemented yet. Coding independent nodes like that make it more efficient to reuse or modify them within and across projects.
You can think of the unit we will make as a lifeless pawn on a game board. It's like a little figurine that you can move around.
The unit's scene
Let us start by designing the unit's scene.
We will use the Path2D and the PathFollow2D nodes to make our sprites move along a path.
Path2D gives you tools to define a curve using a bezier spline, but you can also use it for straight lines.
The PathFollow2D node allows you to move along that path conveniently by animating an offset value.
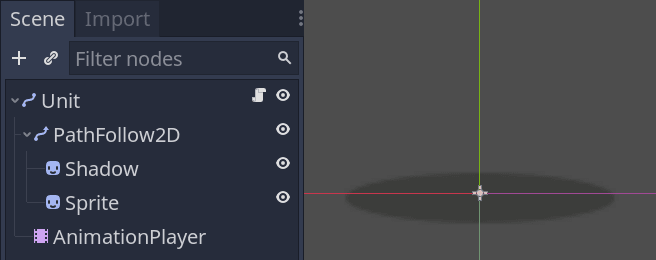
Create a new scene with a Path2D node as its root and add a PathFollow2D as a child.
Select the Path2D node and in the Inspector, clear its Curve property. With the PathFollow2D node, the curve would lock the node in place. We'll set the Curve in the script.
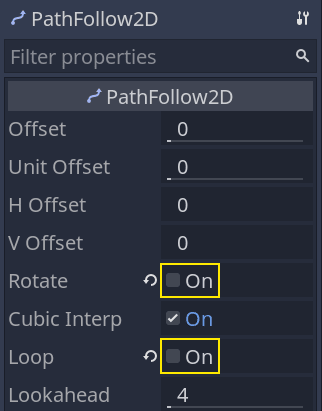
By default, when using PathFollow2D, the node will rotate its children along the path and cycle back to the start. Select the node and turn off the Rotate and Loop properties.
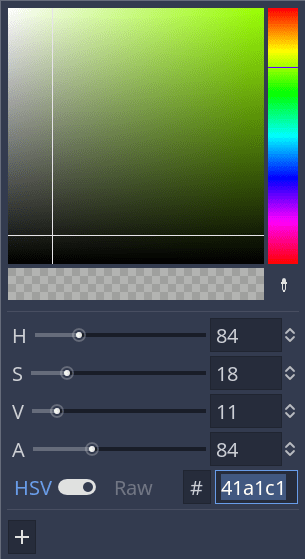
Then, add two sprites as children of PathFollow2D. The first is there to represent the shadow while the other there is going to be the unit. I named them respectively Shadow and Sprite. Assign the texture unit_shadow.svg to the Shadow in the Inspector and set its Modulate color to a dark tone.
You can lower the scale of the Sprite node to 0.25, as the assets we included in the project are large for this game.
We will use the Path2D and the PathFollow2D nodes to make our sprites move along a path.
Path2D gives you tools to define a curve using a bezier spline, but you can also use it for straight lines.
Finally, add an AnimationPlayer as a child of the Unit node. We will use it to make the Sprite blink when the player selects it.
Blinking animation for selected units
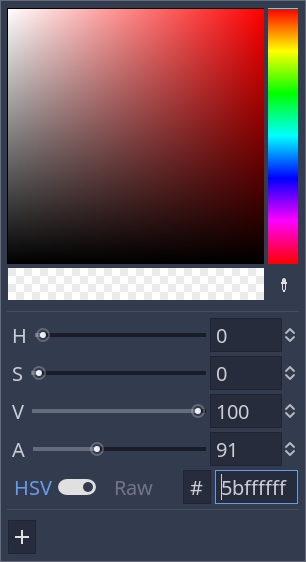
We will use an animation to make the character blink or flash when it is selected. To do that, we'll use the Modulate property and its RAW color mode.
We'll also animate the Sprite node directly so that the Shadow doesn't change color with it.
First, though, let's define an animation named idle. It's an empty animation that resets the sprite's Modulate property. As animations in Godot override the nodes' properties, I recommend always setting up an animation to reset your node to it's default state.
Our idle animation should only have one key for the Modulate property. I typically give this kind of animation a duration of 0 seconds.
Now, we can work on the selected animation.
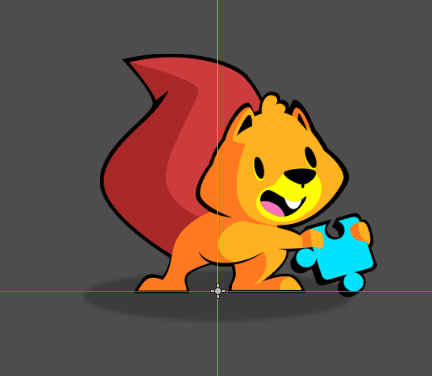
Let's temporarily assign a texture to the Sprite to preview the animation. Drag the squirrel.png to the node's Texture.
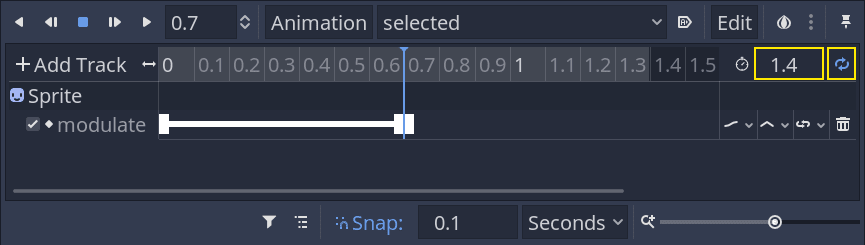
Select the AnimationPlayer and create a new animation named selected. It should loop and last a bit more than one second. I set its duration to 1.4 seconds.
The animation needs two keys that make the Sprite -> Modulate property cycle:
The first one, at the start of the timeline, should use the current modulate color, an opaque white.
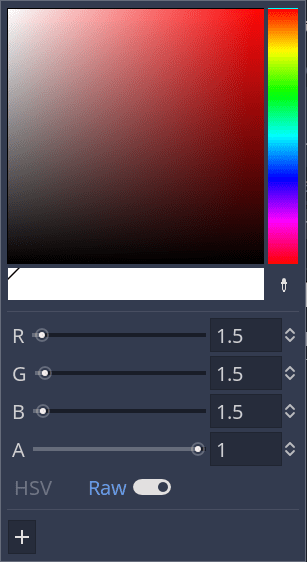
The second one should use the RAW color mode with values higher than 1 in the R, G, and B channels. I used 1.5 for each of them. Doing so makes the sprite become brighter.
Now, you may clear the Sprite node's Texture. We'll use an exported variable in the script to assign a different sprite to each unit instance.
Coding the Unit
Let's move to the code. Attach a script to the Unit node with the following content.
We'll start with most of the node's properties and corresponding setter functions.
## Represents a unit on the game board.## The board manages the Unit's position inside the game grid.## The unit itself is only a visual representation that moves smoothly in the game world.## We use the tool mode so the `skin` and `skin_offset` below update in the editor.
tool
class_name Unit
extendsPath2D## Preload the `Grid.tres` resource you created in the previous part.
export var grid: Resource =preload("res://Grid.tres")## Distance to which the unit can walk in cells.## We'll use this to limit the cells the unit can move to.
export var move_range :=6## Texture representing the unit.## With the `tool` mode, assigning a new texture to this property in the inspector will update the## unit's sprite instantly. See `set_skin()` below.
export var skin: Texture setget set_skin
## Our unit's skin is just a sprite in this demo and depending on its size, we need to offset it so## the sprite aligns with the shadow.
export var skin_offset :=Vector2.ZERO setget set_skin_offset
## The unit's move speed in pixels, when it's moving along a path.
export var move_speed :=600.0## Coordinates of the grid's cell the unit is on.var cell :=Vector2.ZERO setget set_cell
## Toggles the "selected" animation on the unit.var is_selected := false setget set_is_selected
## Through its setter function, the `_is_walking` property toggles processing for this unit.## See `_set_is_walking()` at the bottom of this code snippet.var _is_walking := false setget _set_is_walking
onready var _sprite: Sprite =$PathFollow2D/Sprite
onready var _anim_player: AnimationPlayer =$AnimationPlayer
onready var _path_follow: PathFollow2D =$PathFollow2D## When changing the `cell`'s value, we don't want to allow coordinates outside the grid, so we clamp## them.funcset_cell(value:Vector2)->void:
cell = grid.clamp(value)## The `is_selected` property toggles playback of the "selected" animation.funcset_is_selected(value:bool)->void:
is_selected = value
if is_selected:
_anim_player.play("selected")else:
_anim_player.play("idle")## Both setters below manipulate the unit's Sprite node.## Here, we update the sprite's texture.funcset_skin(value: Texture)->void:
skin = value
# Setter functions are called during the node's `_init()` callback, before they entered the# tree. At that point in time, the `_sprite` variable is `null`. If so, we have to wait to# update the sprite's properties.ifnot _sprite:# The yield keyword allows us to wait until the unit node's `_ready()` callback ended.yield(self,"ready")
_sprite.texture = value
funcset_skin_offset(value:Vector2)->void:
skin_offset = value
ifnot _sprite:yield(self,"ready")
_sprite.position = value
func_set_is_walking(value:bool)->void:
_is_walking = value
set_process(_is_walking)
Now, here's the smooth movement logic.
## Emitted when the unit reached the end of a path along which it was walking.## We'll use this to notify the game board that a unit reached its destination and we can let the## player select another unit.signal walk_finished
func_ready()->void:# We'll use the `_process()` callback to move the unit along a path. Unless it has a path to# walk, we don't want it to update every frame. See `walk_along()` below.set_process(false)# The following lines initialize the `cell` property and snap the unit to the cell's center on the map.
self.cell = grid.calculate_grid_coordinates(position)
position = grid.calculate_map_position(cell)ifnot Engine.editor_hint:# We create the curve resource here because creating it in the editor prevents us from# moving the unit.
curve = Curve2D.new()## When active, moves the unit along its `curve` with the help of the PathFollow2D node.func_process(delta:float)->void:# Every frame, the `PathFollow2D.offset` property moves the sprites along the `curve`.# The great thing about this is it moves an exact number of pixels taking turns into account.
_path_follow.offset += move_speed * delta
# When we increase the `offset` above, the `unit_offset` also updates. It represents how far you# are along the `curve` in percent, where a value of `1.0` means you reached the end.# When that is the case, the unit is done moving.if _path_follow.unit_offset >=1.0:# Setting `_is_walking` to `false` also turns off processing.
self._is_walking = false
# Below, we reset the offset to `0.0`, which snaps the sprites back to the Unit node's# position, we position the node to the center of the target grid cell, and we clear the# curve.# In the process loop, we only moved the sprite, and not the unit itself. The following# lines move the unit in a way that's transparent to the player.
_path_follow.offset =0.0
position = grid.calculate_map_position(cell)
curve.clear_points()# Finally, we emit a signal. We'll use this one with the game board.emit_signal("walk_finished")## Starts walking along the `path`.## `path` is an array of grid coordinates that the function converts to map coordinates.funcwalk_along(path: PoolVector2Array)->void:if path.empty():return# This code converts the `path` to points on the `curve`. That property comes from the `Path2D`# class the Unit extends.
curve.add_point(Vector2.ZERO)for point in path:
curve.add_point(grid.calculate_map_position(point)- position)# We instantly change the unit's cell to the target position. You could also do that when it# reaches the end of the path, using `grid.calculate_grid_coordinates()`, instead.# I did it here because we have the coordinates provided by the `path` argument.# The cell itself represents the grid coordinates the unit will stand on.
cell = path[-1]# The `_is_walking` property triggers the move animation and turns on `_process()`. See# `_set_is_walking()` below.
self._is_walking = true
Here's the complete Unit.gd script without the comments.
tool
class_name Unit
extendsPath2Dsignal walk_finished
export var grid: Resource =preload("res://Grid.tres")
export var skin: Texture setget set_skin
export var move_range :=6
export var skin_offset :=Vector2.ZERO setget set_skin_offset
export var move_speed :=600.0var cell :=Vector2.ZERO setget set_cell
var is_selected := false setget set_is_selected
var _is_walking := false setget _set_is_walking
onready var _sprite: Sprite =$PathFollow2D/Sprite
onready var _anim_player: AnimationPlayer =$AnimationPlayer
onready var _path_follow: PathFollow2D =$PathFollow2Dfunc_ready()->void:set_process(false)
self.cell = grid.calculate_grid_coordinates(position)
position = grid.calculate_map_position(cell)ifnot Engine.editor_hint:
curve = Curve2D.new()func_process(delta:float)->void:
_path_follow.offset += move_speed * delta
if _path_follow.unit_offset >=1.0:
self._is_walking = false
_path_follow.offset =0.0
position = grid.calculate_map_position(cell)
curve.clear_points()emit_signal("walk_finished")funcwalk_along(path: PoolVector2Array)->void:if path.empty():return
curve.add_point(Vector2.ZERO)for point in path:
curve.add_point(grid.calculate_map_position(point)- position)
cell = path[-1]
self._is_walking = true
funcset_cell(value:Vector2)->void:
cell = grid.clamp(value)funcset_is_selected(value:bool)->void:
is_selected = value
if is_selected:
_anim_player.play("selected")else:
_anim_player.play("idle")funcset_skin(value: Texture)->void:
skin = value
ifnot _sprite:yield(self,"ready")
_sprite.texture = value
funcset_skin_offset(value:Vector2)->void:
skin_offset = value
ifnot _sprite:yield(self,"ready")
_sprite.position = value
func_set_is_walking(value:bool)->void:
_is_walking = value
set_process(_is_walking)
Testing the unit
We'll now test our newly created class so you can see how it works. There's quite a lot of code at a glance, but the unit is fairly easy to use.
We'll create our Main scene right away, where we'll add other nodes as we code them.
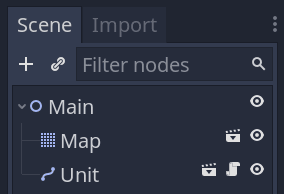
Create a new 2D Scene with a node named Main at its root.
We prepared a map to fill the game's background. Create an instance of the Map.tscn file included in the start project and an instance of the Unit scene you just created.
In the Unit.gd script, at the end of its _ready() function, call walk_along(). It takes a PoolVector2Array of grid coordinates as its argument, and the easiest way to create one is to first create an array with the coordinates that we want to use. Here's an example.
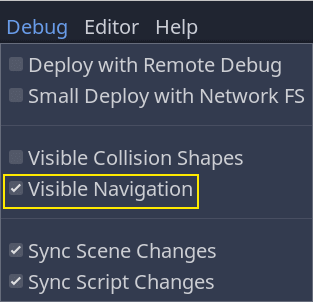
Before running the game, you can enable Visible Navigation in the Debug menu. This will allow you to preview the curve generated by our function.
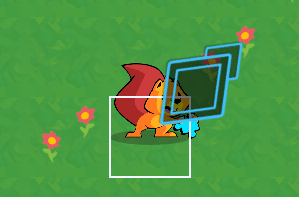
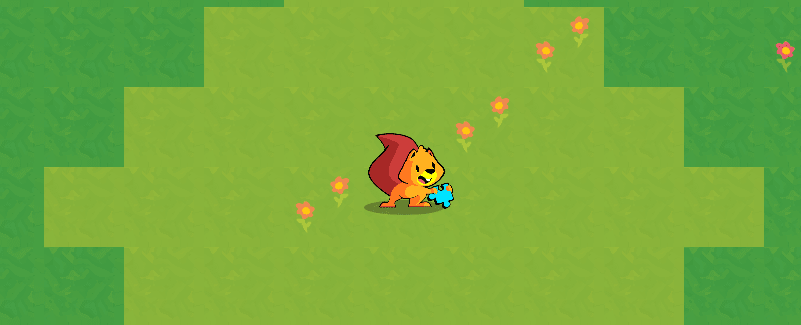
If you play the game you will see that the unit moves without any issue.
To get the result below, I assigned squirrel.png to the Unit_'s Skin property.
In the next part, we will work on the cursor. It's the other element we need to implement unit selection and to issue orders through the game board.
The player's cursor
The cursor will allow the player to navigate the game board and to interact with a cell.
We will make it move on its own and emit signals, so it has zero external dependencies. Any other node in our game will be able to intercept the signals and react to them.
In the final demo, we only use the cursor to select units. But you could also use the "moved" signal that we'll define in a moment to display the current cell in the user interface, for example.
Our cursor will also move automatically at a fixed rate if you keep a direction key down.
Creating the cursor
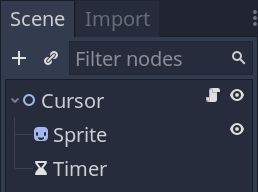
Create the cursor scene with a Node2D as its root named Cursor, a Sprite node, and a Timer node we'll use to limit the frequency of movement when keeping a direction key down.
We need to set the Timer to One Shot. By default, timers keep running in a loop. But to make them work as a cooldown, we have to toggle off that behavior.
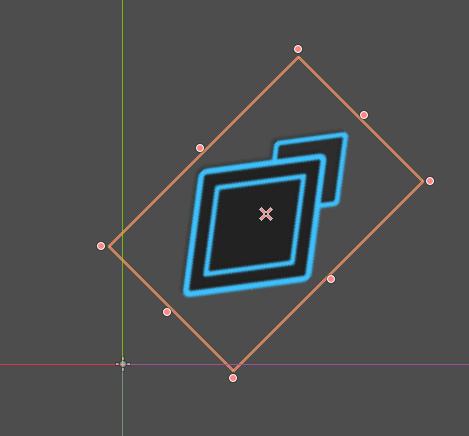
Assign the texture menu_selection_arrow.png to the Sprite_'s Texture. I've rotated the sprite so it points down at the origin like so.
Attach a script to the Cursor, and let's get coding.
## Player-controlled cursor. Allows them to navigate the game grid, select units, and move them.## Supports both keyboard and mouse (or touch) input.## The `tool` mode allows us to preview the drawing code you'll see below in the editor.
tool
class_name Cursor
extendsNode2D## We'll use signals to keep the cursor decoupled from other nodes.## When the player moves the cursor or wants to interact with a cell, we emit a signal and let## another node handle the interaction.## Emitted when clicking on the currently hovered cell or when pressing "ui_accept".signalaccept_pressed(cell)## Emitted when the cursor moved to a new cell.signalmoved(new_cell)## Grid resource, giving the node access to the grid size, and more.
export var grid: Resource =preload("res://Grid.tres")## Time before the cursor can move again in seconds.## You can see how we use it in the unhandled input function below.
export var ui_cooldown :=0.1## Coordinates of the current cell the cursor is hovering.var cell :=Vector2.ZERO setget set_cell
## We use the timer to have a cooldown on the cursor movement.
onready var _timer: Timer =$Timer## When the cursor enters the scene tree, we snap its position to the centre of the cell and we## initialise the timer with our ui_cooldown variable.func_ready()->void:
_timer.wait_time = ui_cooldown
position = grid.calculate_map_position(cell)func_unhandled_input(event: InputEvent)->void:# If the user moves the mouse, we capture that input and update the node's cell in priority.if event is InputEventMouseMotion:
self.cell = grid.calculate_grid_coordinates(event.position)# If we are already hovering the cell and click on it, or we press the enter key, the player# wants to interact with that cell.elif event.is_action_pressed("click")or event.is_action_pressed("ui_accept"):# In that case, we emit a signal to let another node handle that input. The game board will# have the responsibility of looking at the cell's content.emit_signal("accept_pressed", cell)get_tree().set_input_as_handled()# The code below is for the cursor's movement.# The following lines make some preliminary checks to see whether the cursor should move or not# if the user presses an arrow key.var should_move := event.is_pressed()# If the player is pressing the key in this frame, we allow the cursor to move. If they keep the# keypress down, we only want to move after the cooldown timer stops.if event.is_echo():
should_move = should_move and _timer.is_stopped()# And if the cursor shouldn't move, we prevent it from doing so.ifnot should_move:return# Here, we update the cursor's current cell based on the input direction. See the set_cell()# function below to see what changes that triggers.if event.is_action("ui_right"):
self.cell +=Vector2.RIGHTelif event.is_action("ui_up"):
self.cell +=Vector2.UPelif event.is_action("ui_left"):
self.cell +=Vector2.LEFTelif event.is_action("ui_down"):
self.cell +=Vector2.DOWN## We use the draw callback to a rectangular outline the size of a grid cell, with a width of two## pixels.func_draw()->void:# Rect2 is built from the position of the rectangle's top-left corner and its size. To draw the# square around the cell, the start position needs to be `-grid.cell_size / 2`.draw_rect(Rect2(-grid.cell_size /2, grid.cell_size),Color.aliceblue, false,2.0)## This function controls the cursor's current position.funcset_cell(value:Vector2)->void:# We first clamp the cell coordinates and ensure that we weren't trying to move outside the# grid's boundaries.var new_cell:Vector2= grid.clamp(value)if new_cell.is_equal_approx(cell):return
cell = new_cell
# If we move to a new cell, we update the cursor's position, emit a signal, and start the# cooldown timer that will limit the rate at which the cursor moves when we keep the direction# key down.
position = grid.calculate_map_position(cell)emit_signal("moved", cell)
_timer.start()
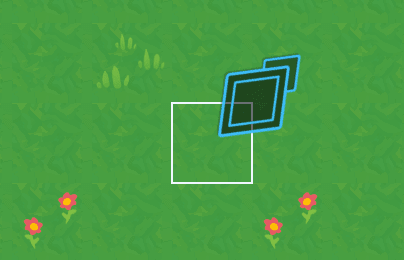
You can now instantiate your cursor in the Main scene to test it. Its code is self-contained, so it should work out of the box.
The cursor currently displays over the unit. We'll address that when with the game board, using a YSort node.
Pathfinding and path drawing
In this lesson, we will create a PathFinder class that extends Godot's built-in AStar2D, an implementation of the AStar pathfinding algorithm.
We will use it to move units to a cell picked by the player, but also to display a preview of the path the unit will walk, inspired by Fire Emblem.
Godot comes with the algorithm implemented and optimized for you. If you want to learn to implement the AStar pathfinding algorithm itself, check out the Introduction to the A Algorithm on Red Blob Games.
While it's often presented in games with grids, the AStar algorithm is flexible. It can find paths on any node graph. You could use it for a road or train network in an open-world game, for example.
To use an AStar2D object in Godot, you:
Add a list of points to the object, giving each a unique index.
Connect all the points that should form a walkable path, using the points' indices.
In the case of a grid, you should connect each cell to its unoccupied neighbors.
Once the graph is set, you call the find_path() function with the indices corresponding to two points: the start and the end. The algorithm outputs a list of coordinates through which you need to navigate to reach the end.
You can already see the catch: the AStar object works with unique IDs for each point in the graph.
This is where our grid class comes in handy with its as_index() method. With this method, we can calculate a unique index for each cell coordinates in our grid.
Here is the code for the PathFinder class. Create a new script and save it there.
## Finds the path between two points among walkable cells using the AStar pathfinding algorithm.class_name PathFinder
extendsReference## We will use that constant in "for" loops later. It defines the directions in which we allow a unit## to move in the game: up, left, right, down.constDIRECTIONS=[Vector2.LEFT,Vector2.RIGHT,Vector2.UP,Vector2.DOWN]var _grid: Resource
## This variable holds an AStar2D instance that will do the actual pathfinding. Our script is mostly## here to initialize that object.var _astar := AStar2D.new()## Initializes the Astar2D object upon creation.func_init(grid: Grid, walkable_cells:Array)->void:# Because we will instantiate the `PathFinder` from our UnitPath's script, we pass it the data it# needs to initialize itself via its constructor function, _init().
_grid = grid
# To create our AStar graph, we will need the index value corresponding to each grid cell. Here,# we cache a mapping between cell coordinates and their unique index. Doing so here slightly# simplifies the code and improves performance a bit.var cell_mappings :={}for cell in walkable_cells:# For each cell, we define a key-value pair of cell coordinates: index.
cell_mappings[cell]= _grid.as_index(cell)# We then add all the cells to our AStar2D instance and connect them to create our pathfinding# graph._add_and_connect_points(cell_mappings)## Returns the path found between `start` and `end` as an array of Vector2 coordinates.funccalculate_point_path(start:Vector2, end:Vector2)-> PoolVector2Array:# With the AStar algorithm, we have to use the points' indices to get a path. This is why we# need a reliable way to calculate an index given some input coordinates.# Our Grid.as_index() method does just that.var start_index:int= _grid.as_index(start)var end_index:int= _grid.as_index(end)# We just ensure that the AStar graph has both points defined. If not, we return an empty# PoolVector2Array() to avoid errors.if _astar.has_point(start_index)and _astar.has_point(end_index):# The AStar2D object then finds the best path between the two indices.return _astar.get_point_path(start_index, end_index)else:returnPoolVector2Array()## Adds and connects the walkable cells to the Astar2D object.func_add_and_connect_points(cell_mappings:Dictionary)->void:# This function works with two loops. First, we register all our points in the AStar graph.# We pass each cell's unique index and the corresponding Vector2 coordinates to the# AStar2D.add_point() function.for point in cell_mappings:
_astar.add_point(cell_mappings[point], point)# Then, we loop over the points again, and we connect them with all their neighbors. We use# another function to find the neighbors given a cell's coordinates.for point in cell_mappings:for neighbor_index in_find_neighbor_indices(point, cell_mappings):# The AStar2D.connect_points() function connects two points on the graph by index, *not*# by coordinates.
_astar.connect_points(cell_mappings[point], neighbor_index)## Returns an array of the `cell`'s connectable neighbors.func_find_neighbor_indices(cell:Vector2, cell_mappings:Dictionary)->Array:var out :=[]# To find the neighbors, we try to move one cell in every possible direction and is ensure that# this cell is walkable and not already connected.for direction inDIRECTIONS:var neighbor:Vector2= cell + direction
# This line ensures that the neighboring cell is part of our walkable cells.ifnot cell_mappings.has(neighbor):continue# Because we call the function for every cell, we will get neighbors that are already# connected. If you don't don't check for existing connections, you'll get many errors.ifnot _astar.are_points_connected(cell_mappings[cell], cell_mappings[neighbor]):
out.push_back(cell_mappings[neighbor])return out
In the next lesson, we'll use the PathFinder to find and draw a path between two cells.
Drawing the path
We can now use our PathFinder to draw a preview of the path the player wants its unit to walk.
To do so, we'll use a TileMap node with a script. We can leverage the TileMap_'s autotile feature to draw a nice-looking path with rounded corners and an arrow at both ends.
If you don't like the double arrow, you can draw a sprite on top of the starting cell to cover it up.
In this demo, we'll generate a PathFinder on-the-fly every time the player selects a unit and use it to draw a preview of the path between the unit and the cursor.
The reason is those cells can change every time you select a unit: they depend on the unit's position on the map and the position of the obstacles relative to it. In our case, the obstacles are other units.
Our units can walk a limited number of cells, so we don't have to worry about performance. Even on a low-end device, generating an AStar graph to walk a dozen cells should take a negligible amount of time. And finding a path itself is much cheaper.
In this lesson, we'll only to implement the path drawing. When working on the game board, we'll implement a flood fill algorithm to provide the PathFinder with an array of walkable cells.
Creating and coding the UnitPath
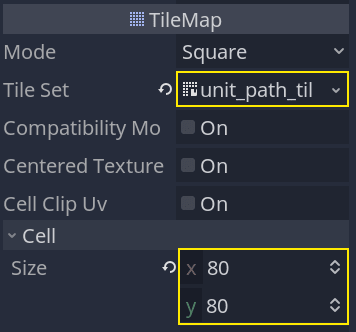
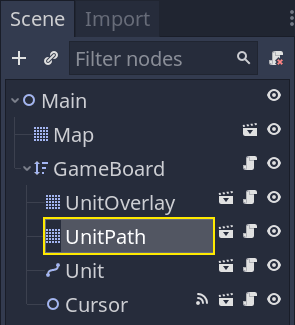
Create a new scene with a TileMap node named UnitPath. In the start project, you'll find a premade tileset, unit_path_tileset.tres. Assign it to the node's TileSet property and set the Cell -> Size to 80 by 80.
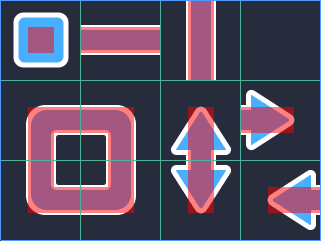
The tileset itself has one autotile with a 3x3 bitmask that'll allow us to draw a smooth path.
Everything else happens in the code, where we use the PathFinder class we coded in the previous lesson. Save your scene and attach a new script to the UnitPath.
## Draws the unit's movement path using an autotile.class_name UnitPath
extendsTileMap
export var grid: Resource
## This variable holds a reference to a PathFinder object. We'll create a new one every time the ## player select a unit.var _pathfinder: PathFinder
## This property caches a path found by the _pathfinder above.## We cache the path so we can reuse it from the game board. If the player decides to confirm unit## movement with the cursor, we can pass the path to the unit's walk_along() function.var current_path :=PoolVector2Array()## Creates a new PathFinder that uses the AStar algorithm we use to find a path between two cells ## among the `walkable_cells`.## We'll call this function every time the player selects a unit.funcinitialize(walkable_cells:Array)->void:
_pathfinder = PathFinder.new(grid, walkable_cells)## Finds and draws the path between `cell_start` and `cell_end`.funcdraw(cell_start:Vector2, cell_end:Vector2)->void:# We first clear any tiles on the tilemap, then let the Astar2D (PathFinder) find the# path for us.clear()
current_path = _pathfinder.calculate_point_path(cell_start, cell_end)# And we draw a tile for every cell in the path.for cell in current_path:set_cellv(cell,0)# The function below updates the auto-tiling. Without it, you wouldn't get the nice path with curves# and the arrows on either end.update_bitmask_region()## Stops drawing, clearing the drawn path and the `_pathfinder`.funcstop()->void:
_pathfinder = null
clear()
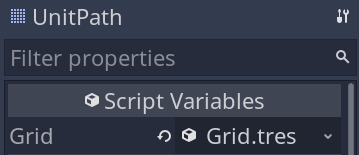
Before we test the path, you'll need to head back to the Inspector and assign our grid to the node's Grid property.
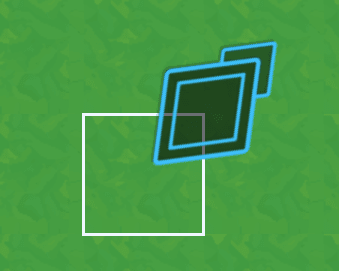
Testing our path
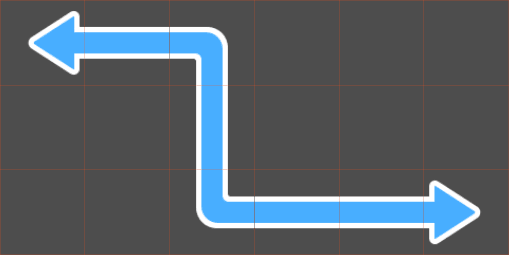
To test the path drawing, we can write some temporary code in the UnitPath_'s _ready() callback.
func_ready()->void:# These two points define the start and the end of a rectangle of cells.var rect_start :=Vector2(4,4)var rect_end :=Vector2(10,8)# The following lines generate an array of points filling the rectangle from rect_start to rect_end.var points :=[]# In a for loop, writing a number or expression that evaluates to a number after the "in" # keyword implicitly calls the range() function.# For example, "for x in 3" is a shorthand for "for x in range(3)".for x in rect_end.x - rect_start.x +1:for y in rect_end.y - rect_start.y +1:
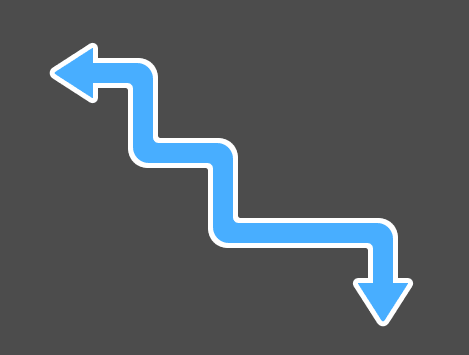
points.append(rect_start +Vector2(x, y))# We can use the points to generate our PathFinder and draw a path.initialize(points)draw(rect_start,Vector2(8,7))
The PathFinder finds the path between rect_start and Vector2(8, 7) and allows us to draw it in the draw() function.
In the next lessons, we'll bring all the nodes together by coding the last piece of the puzzle: the GameBoard, that coordinates everything.
The flood fill algorithm
In this lesson, we will finally create the GameBoard and implement the flood fill algorithm.
We'll use it to find and draw the cells that a given unit can walk.
Creating the GameBoard
In our demo, the GameBoard will be a direct parent of the units and the cursor.
We'll make it a YSort node to manage the visual order of the units. If you put several units on the board and move them up and down, they will maintain their order and appear in front of another while they should appear behind it.
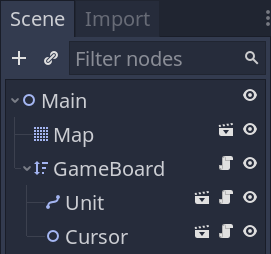
In your main scene, create a new YSort node named GameBoard. Make the units and the Cursor a child of it.
Everything else happens in the code.
Storing obstacles
Attach a new script to the GameBoard, and let's start by registering all the obstacles on the board. We'll need to take them into account in our flood fill algorithm. In our case, the only obstacles will be the units.
## Represents and manages the game board. Stores references to entities that are in each cell and## tells whether cells are occupied or not.## Units can only move around the grid one at a time.class_name GameBoard
extendsNode2D## This constant represents the directions in which a unit can move on the board. We will reference## the constant later in the script.constDIRECTIONS=[Vector2.LEFT,Vector2.RIGHT,Vector2.UP,Vector2.DOWN]## Once again, we use our grid resource that we explicitly define in the class.
export var grid: Resource =preload("res://Grid.tres")## We use a dictionary to keep track of the units that are on the board. Each key-value pair in the## dictionary represents a unit. The key is the position in grid coordinates, while the value is a## reference to the unit.## Mapping of coordinates of a cell to a reference to the unit it contains.var _units :={}## At the start of the game, we initialize the game board. Look at the `_reinitialize()` function below.## It populates our `_units` dictionary.func_ready()->void:_reinitialize()## Returns `true` if the cell is occupied by a unit.funcis_occupied(cell:Vector2)->bool:return true if _units.has(cell)else false
## Clears, and refills the `_units` dictionary with game objects that are on the board.func_reinitialize()->void:
_units.clear()# In this demo, we loop over the node's children and filter them to find the units. As your game# becomes more complex, you may want to use the node group feature instead to place your units# anywhere in the scene tree.for child inget_children():# We can use the "as" keyword to cast the child to a given type. If the child is not of type# Unit, the variable will be null.var unit := child as Unit
ifnot unit:continue# As mentioned when introducing the units variable, we use the grid coordinates for the key# and a reference to the unit for the value. This allows us to access a unit given its grid# coordinates.
_units[unit.cell]= unit
To test the code, in the _ready() function, you can print() the _units variable. The output should look like this:
{(8, 7):[Path2D:1217]}
Implementing the flood fill
Let's code the flood fill algorithm.
It works by starting from a cell and looking at its neighbors. If a neighbor meets some conditions, we add it to an array and apply the same flood fill instructions to it.
You end up expanding from a starting point until all neighboring cells fail to meet the conditions.
In a drawing application, the conditions to fill a neighboring pixel would be:
Being within the document's bounds.
The adjacent pixel is of the same color as the one you filled initially.
In our case, with a grid, it's similar. The conditions to fill a neighbor are that:
The coordinates are within the grid's bounds.
The neighboring cell is not occupied
We are within the unit's maximum movement range.
There are two main ways to implement this algorithm. On the one hand, you can implement a recursive function, one that will call itself until you filled all the cells.
Here, we will use a while loop instead. This is because I had some issues with references to the output array with the recursive calls.
Arrays are passed by reference in GDScript. Even if you do recursive function calls, as long as you keep passing the same array around, all functions on the stack should point to the same reference.
But when experimenting with recursivity, I found that some calls on the stack would return early, and some parts of the board would not get filled as expected. This could be my mistake, although a teammate confirmed having a similar issue in a complex recursive function.
Anyway, here's the implementation.
## Returns an array of cells a given unit can walk using the flood fill algorithm.funcget_walkable_cells(unit: Unit)->Array:return_flood_fill(unit.cell, unit.move_range)## Returns an array with all the coordinates of walkable cells based on the `max_distance`.func_flood_fill(cell:Vector2, max_distance:int)->Array:# This is the array of walkable cells the algorithm outputs.var array :=[]# The way we implemented the flood fill here is by using a stack. In that stack, we store every# cell we want to apply the flood fill algorithm to.var stack :=[cell]# We loop over cells in the stack, popping one cell on every loop iteration.whilenot stack.empty():var current = stack.pop_back()# For each cell, we ensure that we can fill further.## The conditions are:# 1. We didn't go past the grid's limits.# 2. We haven't already visited and filled this cell# 3. We are within the `max_distance`, a number of cells.ifnot grid.is_within_bounds(current):continueif current in array:continue# This is where we check for the distance between the starting `cell` and the `current` one.var difference:Vector2=(current - cell).abs()var distance :=int(difference.x + difference.y)if distance > max_distance:continue# If we meet all the conditions, we "fill" the `current` cell. To be more accurate, we store# it in our output `array` to later use them with the UnitPath and UnitOverlay classes.
array.append(current)# We then look at the `current` cell's neighbors and, if they're not occupied and we haven't# visited them already, we add them to the stack for the next iteration.# This mechanism keeps the loop running until we found all cells the unit can walk.for direction inDIRECTIONS:var coordinates:Vector2= current + direction
# This is an "optimization". It does the same thing as our `if current in array:` above# but repeating it here with the neighbors skips some instructions.ifis_occupied(coordinates):continueif coordinates in array:continue# This is where we extend the stack.
stack.append(coordinates)return array
The interactive overlay
We could test the get_walkable_cells() function and our flood fill implementation through it by calling the print() function. But we might as well implement the UnitOverlay, which will display the cells on the map.
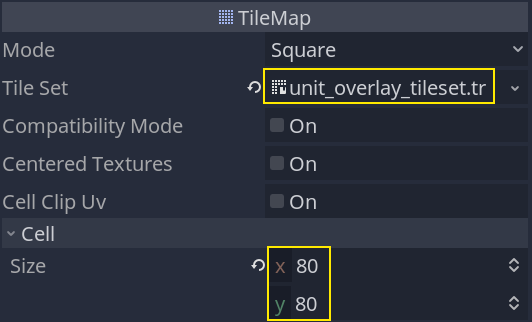
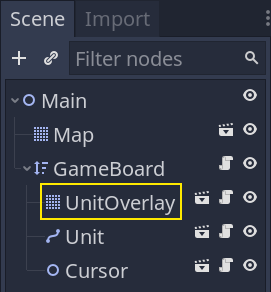
Create a new scene with a TileMap node named UnitOverlay. Assign the unit_overlay_tileset.tres to its TileSet property and set the Cell -> Size to 80 by 80.
Change its Visibility -> Modulate property to a transparent white. Otherwise, the tilemap will draw an opaque yellow.
Attach a script to it with the following code.
## Draws an overlay over an array of cells.class_name UnitOverlay
extendsTileMap## By making the tilemap half-transparent, using the modulate property, we only have two draw the## cells, and we automatically get a nice overlay on the board.## The function fills the tilemap with the cells, giving visual feedback on where a unit can walk.funcdraw(cells:Array)->void:clear()# We loop over the cells and assign them the only tile available in the tileset, tile 0.for cell in cells:set_cellv(cell,0)
Instantiate the UnitOverlay in the Main scene as a child of GameBoard and above everything else. Placing it before every unit will make it draw behind them, so long as you leave it at its default position, Vector2(0, 0).
We can now access it from the GameBoard_'s script and call its draw() function.
Open GameBoard.gd again and add the following code.
onready var _unit_overlay: UnitOverlay =$UnitOverlayfunc_ready()->void:#...# This call is temporary, remove it after testing and seeing the overlay works as expected.
_unit_overlay.draw(get_walkable_cells($Unit))
The code so far
Here's the GameBoard script so far, without all the comments.
class_name GameBoard
extendsNode2DconstDIRECTIONS=[Vector2.LEFT,Vector2.RIGHT,Vector2.UP,Vector2.DOWN]
export var grid: Resource =preload("res://Grid.tres")var _units :={}
onready var _unit_path: UnitPath =$UnitPathfunc_ready()->void:_reinitialize()funcis_occupied(cell:Vector2)->bool:return true if _units.has(cell)else false
funcget_walkable_cells(unit: Unit)->Array:return_flood_fill(unit.cell, unit.move_range)func_reinitialize()->void:
_units.clear()for child inget_children():var unit := child as Unit
ifnot unit:continue
_units[unit.cell]= unit
func_flood_fill(cell:Vector2, max_distance:int)->Array:var array :=[]var stack :=[cell]whilenot stack.empty():var current = stack.pop_back()ifnot grid.is_within_bounds(current):continueif current in array:continuevar difference:Vector2=(current - cell).abs()var distance :=int(difference.x + difference.y)if distance > max_distance:continue
array.append(current)for direction inDIRECTIONS:var coordinates:Vector2= current + direction
ifis_occupied(coordinates):continueif coordinates in array:continue
stack.append(coordinates)return array
Code unit selection and cursor interaction
In this lesson, we'll work on the last piece of the puzzle: coordinating interactions between the cursor, the units, and the board.
Here are the interactions we want to allow:
If the cursor hovers a cell and it contains a unit, the player can select it.
When a unit is selected, pressing Esc deselects it.
When a unit is selected and the cursor hovers a different cell, pressing Enter or clicking the cell issues a move command.
Selecting a unit should also make the UnitOverlay and UnitPath nodes display information about where the unit can and will move.
We'll coordinate these actions with the GameBoard.
In the Main scene, if you haven't already, you should first instantiate UnitPath as a child of GameBoard.
Everything else will happen in GameBoard.gd. Open the script and let's start adding features.
We'll start with two properties to track the active unit and cache a reference to our UnitPath.
## The board is going to move one unit at a time. When we select a unit, we will save it as our## `_active_unit` and populate the walkable cells below. This allows us to clear the unit, the## overlay, and the interactive path drawing later on when the player decides to deselect it.var _active_unit: Unit
## This is an array of all the cells the `_active_unit` can move to. We will populate the array when## selecting a unit and use it in the `_move_active_unit()` function below.var _walkable_cells :=[]
onready var _unit_path: UnitPath =$UnitPath
Then, let's add functions for the main commands we want to handle: select, move, and deselect. We have one function corresponding to each command, with an extra one to clear the properties we just defined, _clear_active_unit().
## Selects the unit in the `cell` if there's one there.## Sets it as the `_active_unit` and draws its walkable cells and interactive move path.## The board reacts to the signals emitted by the cursor. And it does so by calling functions that## select and move a unit.func_select_unit(cell:Vector2)->void:# Here's some optional defensive code: we return early from the function if the unit's not# registered in the `cell`.ifnot _units.has(cell):return# When selecting a unit, we turn on the overlay and path drawing. We could use signals on the# unit itself to do so, but that would split the logic between several files without a big# maintenance benefit and we'd need to pass extra data to the unit.# I decided to group everything in the GameBoard class because it keeps all the selection logic# in one place. I find it easy to keep track of what the class does this way.
_active_unit = _units[cell]
_active_unit.is_selected = true
_walkable_cells =get_walkable_cells(_active_unit)
_unit_overlay.draw(_walkable_cells)
_unit_path.initialize(_walkable_cells)## Deselects the active unit, clearing the cells overlay and interactive path drawing.## We need it for the `_move_active_unit()` function below, and we'll use it again in a moment.func_deselect_active_unit()->void:
_active_unit.is_selected = false
_unit_overlay.clear()
_unit_path.stop()## Clears the reference to the _active_unit and the corresponding walkable cells.## We need it for the `_move_active_unit()` function below.func_clear_active_unit()->void:
_active_unit = null
_walkable_cells.clear()## Updates the _units dictionary with the target position for the unit and asks the _active_unit to## walk to it.func_move_active_unit(new_cell:Vector2)->void:ifis_occupied(new_cell)ornot new_cell in _walkable_cells:return# When moving a unit, we need to update our `_units` dictionary. We instantly save it in the# target cell even if the unit itself will take time to walk there.# While it's walking, the player won't be able to issue new commands.
_units.erase(_active_unit.cell)
_units[new_cell]= _active_unit
# We also deselect it, clearing up the overlay and path._deselect_active_unit()# We then ask the unit to walk along the path stored in the UnitPath instance and wait until it# finished.
_active_unit.walk_along(_unit_path.current_path)yield(_active_unit,"walk_finished")# Finally, we clear the `_active_unit`, which also clears the `_walkable_cells` array._clear_active_unit()
And with the functions defined, we can implement the interactions.
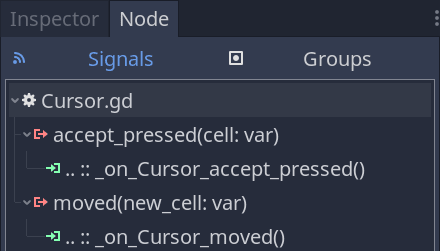
For two of them, we need to connect our Cursor_'s signals to the GameBoard. To do so, you can head back to the editor, select the Cursor, and in the Node dock, connect both moved and accept_pressed to the GameBoard.
Back to GameBoard.gd, we can use the signal callbacks to select, move units, and update the UnitPath_'s drawing.
## Updates the interactive path's drawing if there's an active and selected unit.func_on_Cursor_moved(new_cell:Vector2)->void:# When the cursor moves, and we already have an active unit selected, we want to update the# interactive path drawing.if _active_unit and _active_unit.is_selected:
_unit_path.draw(_active_unit.cell, new_cell)## Selects or moves a unit based on where the cursor is.func_on_Cursor_accept_pressed(cell:Vector2)->void:# The cursor's "accept_pressed" means that the player wants to interact with a cell. Depending# on the board's current state, this interaction means either that we want to select a unit all# that we want to give it a move order.ifnot _active_unit:_select_unit(cell)elif _active_unit.is_selected:_move_active_unit(cell)
All we're missing now is Esc to cancel the selection.
To do so, we can use the _unhandled_input() callback.
func_unhandled_input(event: InputEvent)->void:if _active_unit and event.is_action_pressed("ui_cancel"):_deselect_active_unit()_clear_active_unit()
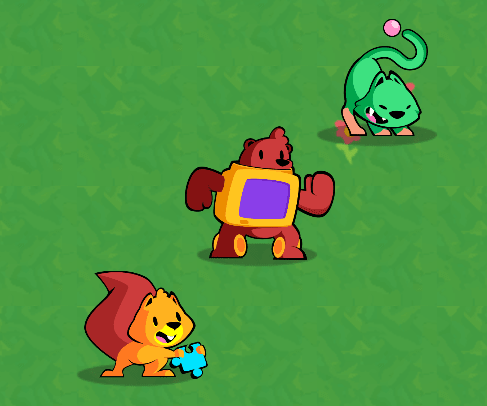
And with that, you should be able to select and move units. Also, you can place multiple units on the board. Just ensure they aren't on the same cell to avoid errors.
This concludes our free tactical RPG movement series with Godot.
If you'd like to go further, check out our course Godot 2D Secrets, from which it was open-sourced.
It comes with longer tutorial series than this one, challenges to improve your game development skills, questions and answers, and lifetime free updates.
It also funds the hundreds of hours we spend creating free tutorials and open-source projects.
The GameBoard code
Here's the complete GameBoard script.
class_name GameBoard
extendsNode2DconstDIRECTIONS=[Vector2.LEFT,Vector2.RIGHT,Vector2.UP,Vector2.DOWN]
export var grid: Resource =preload("res://Grid.tres")var _units :={}var _active_unit: Unit
var _walkable_cells :=[]
onready var _unit_overlay: UnitOverlay =$UnitOverlay
onready var _unit_path: UnitPath =$UnitPathfunc_ready()->void:_reinitialize()funcis_occupied(cell:Vector2)->bool:return true if _units.has(cell)else false
funcget_walkable_cells(unit: Unit)->Array:return_flood_fill(unit.cell, unit.move_range)func_reinitialize()->void:
_units.clear()for child inget_children():var unit := child as Unit
ifnot unit:continue
_units[unit.cell]= unit
func_flood_fill(cell:Vector2, max_distance:int)->Array:var array :=[]var stack :=[cell]whilenot stack.empty():var current = stack.pop_back()ifnot grid.is_within_bounds(current):continueif current in array:continuevar difference:Vector2=(current - cell).abs()var distance :=int(difference.x + difference.y)if distance > max_distance:continue
array.append(current)for direction inDIRECTIONS:var coordinates:Vector2= current + direction
ifis_occupied(coordinates):continueif coordinates in array:continue
stack.append(coordinates)return array
func_select_unit(cell:Vector2)->void:ifnot _units.has(cell):return
_active_unit = _units[cell]
_active_unit.is_selected = true
_walkable_cells =get_walkable_cells(_active_unit)
_unit_overlay.draw(_walkable_cells)
_unit_path.initialize(_walkable_cells)func_deselect_active_unit()->void:
_active_unit.is_selected = false
_unit_overlay.clear()
_unit_path.stop()func_clear_active_unit()->void:
_active_unit = null
_walkable_cells.clear()func_move_active_unit(new_cell:Vector2)->void:ifis_occupied(new_cell)ornot new_cell in _walkable_cells:return
_units.erase(_active_unit.cell)
_units[new_cell]= _active_unit
_deselect_active_unit()
_active_unit.walk_along(_unit_path.current_path)yield(_active_unit,"walk_finished")_clear_active_unit()func_on_Cursor_moved(new_cell:Vector2)->void:if _active_unit and _active_unit.is_selected:
_unit_path.draw(_active_unit.cell, new_cell)func_on_Cursor_accept_pressed(cell:Vector2)->void:ifnot _active_unit:_select_unit(cell)elif _active_unit.is_selected:_move_active_unit(cell)func_unhandled_input(event: InputEvent)->void:if _active_unit and event.is_action_pressed("ui_cancel"):_deselect_active_unit()_clear_active_unit()