How to do top-down game movement in Godot
2021/02/14
- Type
- Learning Resource
- Format
- Tutorial
- Version
- Godot 3.x
- Subject Tags
- Code
- MIT
- Game Assets
- CC BY-NC-SA
- All else
- 2016-2026, GDQuest© - All rights reserved
- Created
- Updated
- 2021/02/14
- 2021/02/14
In this tutorial, you will learn to implement three different movements for your characters in Godot:
You can find the full source code of the project here.
We use input actions to link a specific event (keystrokes, mouse, or joystick interactions) with an action in our game.
For instance, if we want our character to jump when we press the space key, right-click, or the gamepad's X button, we should link an action to these three events.
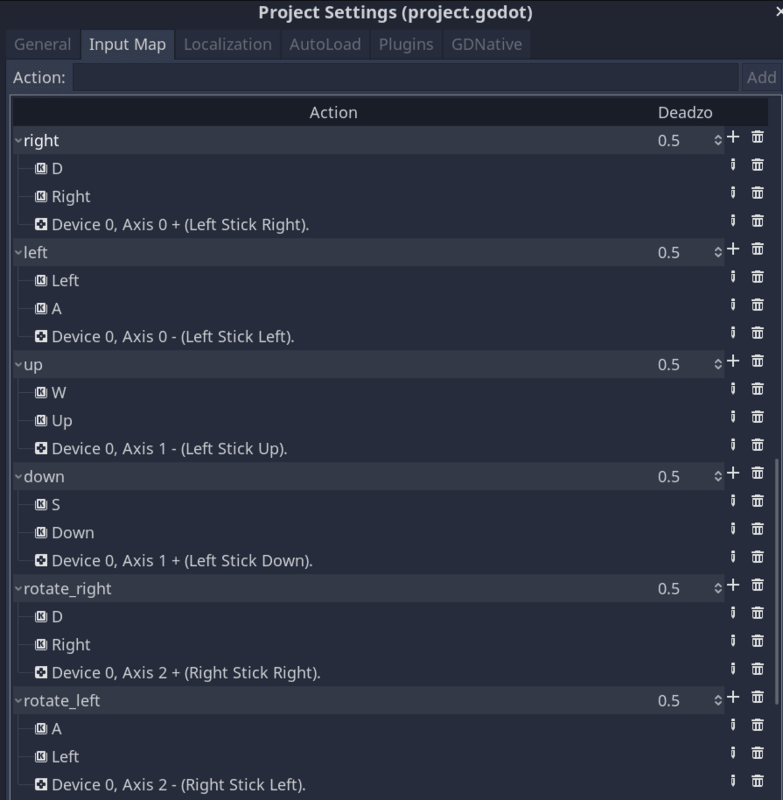
To create an action named right, open Project -> Project Settings... -> Input Map, write in the Action field right, and press the Add button. You can see this action has appeared in the list below.
Now, to link events to trigger this action, click on the + button you can find at the end of the field right (the one you have just created). Add one Key for the right arrow and another one for the D key.
Finally, as we want to support analog movement (joysticks), add a Joy Axis to the right.
You can review the rest of the actions you have to specify in the following image.
First, we'll create a base scene we can use to implement every movement.
We create a scene with a KinematicBody2D named PlayerTopDown as the root and two children: a CollisionShape2D and an AnimatedSprite. We use an AnimatedSprite here to change the character's texture depending on the movement direction.
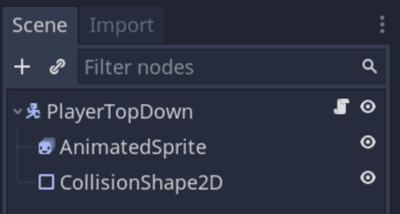
In the Inspector, add a New SpriteFrames in the Frames property of the AnimatedSprite with all your character's textures.
Remember the different sprites' indices, as you will have to match them with the directions in the code.
Let's start with the Asteroids movement as it's the shortest and simplest.
We want some spaceship that rotates when we press rotate_left or rotate_right, moves forward when we press up, and backward when we press down.
In this tutorial, notice how we use Input.get_action_strength() to calculate the player's input direction. This function gives us support for analog controllers, like joysticks, allowing the player to move more precisely than with the keyboard.
The function will return 1.0 if you press a key on the keyboard and a value between 0.0 and 1.0 when using a joystick. This is why we can directly do subtractions with it.
Attach a script to the PlayerTopDown node with the following code to implement this movement.
# Movement where the character rotates and moves forward or backward.
extends KinematicBody2D

# Movement speed in pixels per second.
export var speed := 500
# Rotation speed in radians per second.
export var angular_speed := 5.0


func _physics_process(delta):
	# See how we're using Input.get_action_strength() to calculate the direction we rotate.
	# The value will be in the [-1.0, 1.0] range.
	var rotate_direction := Input.get_action_strength("rotate_right") - Input.get_action_strength("rotate_left")
	rotation += rotate_direction * angular_speed * delta
	# Below, we calculate the forward or backward move direction and directly multiply it to calculate a velocity.
	# `transform.y` stores the node's local axes, allowing us to move it in the direction it's currently facing.
	var velocity := (Input.get_action_strength("down") - Input.get_action_strength("up")) * transform.y * speed
move_and_slide(velocity)To implement a top-down movement in eight directions, replace your PlayerTopDown node's script with the following code.
Below, we introduce a function to update our character's sprite. We also normalize our direction vector. Doing this ensures it always has a length of 1.0 (or 0.0 if the player isn't pressing any movement key).
Why? When you press both right and down without normalizing the vector, the direction calculation below will result in Vector2(1, 1). Such a vector has a length of about 1.4 (it's the diagonal of a square of width 1.0). But when you only press the right key, the vector would be Vector2(1.0, 0.0) and have a length of 1.0. In that case, the character would end up moving 40% faster when going diagonally compared to moving left, right, up, or down. The Vector2.normalized() method prevents this issue.
extends KinematicBody2D

# Movement speed in pixels per second.
export var speed := 500

# We map a direction to a frame index of our AnimatedSprite node's sprite frames.
# See how we use it below to update the character's look direction in the game.
var _sprites := {Vector2.RIGHT: 1, Vector2.LEFT: 2, Vector2.UP: 3, Vector2.DOWN: 4}
var _velocity := Vector2.ZERO

onready var animated_sprite: AnimatedSprite = $AnimatedSprite


func _physics_process(_delta: float) -> void:
	# Once again, we call `Input.get_action_strength()` to support analog movement.
	var direction := Vector2(
		# This first line calculates the X direction, the vector's first component.
		Input.get_action_strength("right") - Input.get_action_strength("left"),
		# And here, we calculate the Y direction. Note that the Y-axis points
		# DOWN in games.
		# That is to say, a Y value of `1.0` points downward.
		Input.get_action_strength("down") - Input.get_action_strength("up")
	)
	# When aiming the joystick diagonally, the direction vector can have a length
	# greater than 1.0, making the character move faster than our maximum expected
	# speed. When that happens, we limit the vector's length to ensure the player
	# can't go beyond the maximum speed.
	if direction.length() > 1.0:
		direction = direction.normalized()
	move_and_slide(speed * direction)


# The code below updates the character's sprite to look in a specific direction.
func _unhandled_input(event):
	if event.is_action_pressed("right"):
		_update_sprite(Vector2.RIGHT)
	elif event.is_action_pressed("left"):
		_update_sprite(Vector2.LEFT)
	elif event.is_action_pressed("down"):
		_update_sprite(Vector2.DOWN)
	elif event.is_action_pressed("up"):
		_update_sprite(Vector2.UP)


func _update_sprite(direction: Vector2) -> void:
animated_sprite.frame = _sprites[direction]There's a series of little movement algorithms for games called steering behaviors that game developers use a lot. You can use them to smooth out your characters' movements and give them a bit of inertia.
For this new movement, you need to add a new variable at the beginning of the previous script (friction), which will control the inertia of the movement. You can play with this value to see how it affects your character's movement.
A greater value will make your character react more rapidly. Lower values imply a higher time to reach the maximum speed or stop the movement.
# A factor that controls the character's inertia.
export var friction = 0.18
Change the previous _physics_process with this new method:
func _physics_process(delta):
	var direction := Vector2(
		Input.get_action_strength("right") - Input.get_action_strength("left"),
		Input.get_action_strength("down") - Input.get_action_strength("up")
	)
	if direction.length() > 1.0:
		direction = direction.normalized()
	# Using the follow steering behavior.
	var target_velocity = direction * speed
	_velocity += (target_velocity - _velocity) * friction
	_velocity = move_and_slide(_velocity)
You can use a steering behavior to arrive at a target point smoothly, accelerating and decelerating gradually.
These behaviors are commonly used for AI but also in arcade racing games and much more.
In the open-source demo we prepared for you, you can load different mini-game scenes by pressing 1, 2, or 3 on your keyboard. Here's how we achieved that, as a bonus.
There are three scenes to test all the movements with a similar structure but changing the player node. These scenes are composed of an instantiated scene (Level1) with some obstacles, a Sprite for the level background, and a StaticBody2D to set the limits of the level.
They have another instantiated scene (SceneIndicator) to show a title with the name of the movement we are testing.
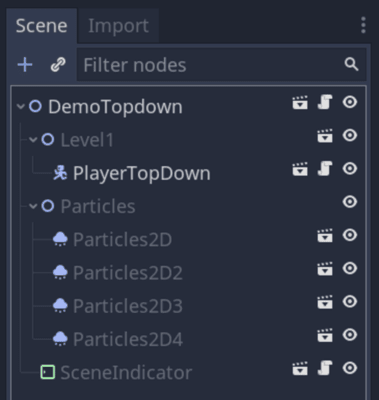
And finally, they have four particle emitters to generate little white squares you see moving in the back (just for aesthetic reasons).
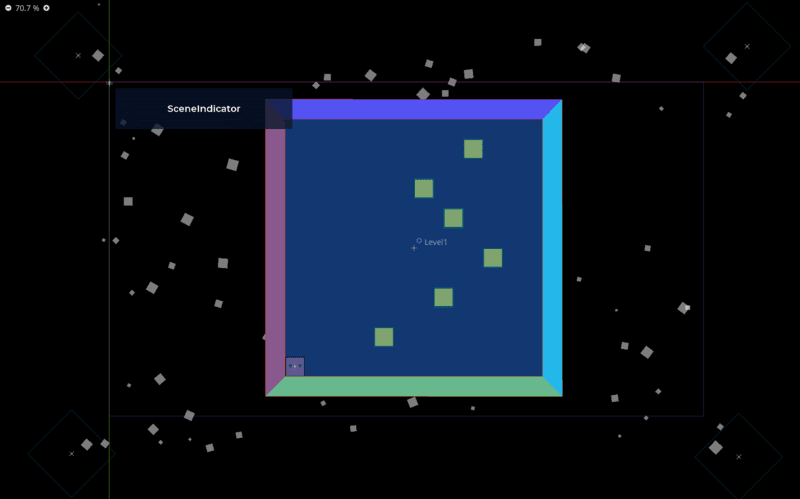
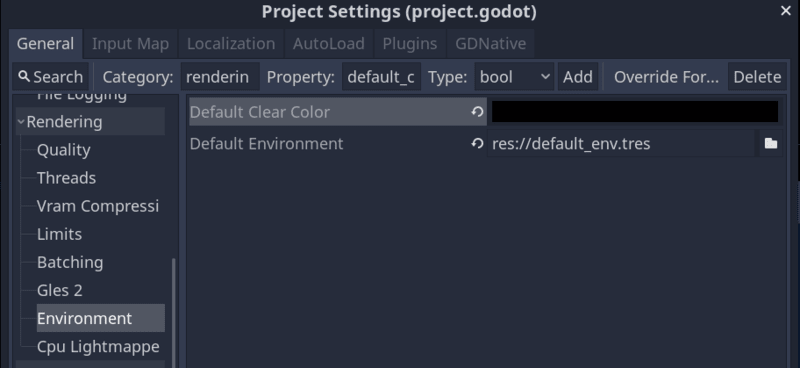
We have changed the background default color of the scene. You can do this in Project -> Project Settings... -> Rendering -> Environment -> Default Clear Color.
And finally, the following script changes the scene depending on the number you pressed (1-3):
extends Node2D

var topdown_scene := "res://Levels/DemoTopdown.tscn"
var topdown_acceleration_scene := "res://Levels/DemoTopdownAcceleration.tscn"
var rotate_move_scene := "res://Levels/DemoRotate.tscn"


func _unhandled_input(event):
	if event.is_action_pressed("load_topdown"):
		get_tree().change_scene(topdown_scene)
	elif event.is_action_pressed("load_topdown_acc"):
		get_tree().change_scene(topdown_acceleration_scene)
	elif event.is_action_pressed("load_rotate_move"):
		get_tree().change_scene(rotate_move_scene)
Remember to add these three actions to the project's input maps, as we have seen before.
Don't stop here. Step-by-step tutorials are fun but they only take you so far.
Try one of our proven study programs to become an independent Gamedev truly capable of realizing the games you’ve always wanted to make.
Get help from peers and pros on GDQuest's Discord server!
20,000 membersJoin ServerThere are multiple ways you can join our effort to create free and open source gamedev resources that are accessible to everyone!
Sponsor this library by learning gamedev with us onGDSchool
Learn MoreImprove and build on assets or suggest edits onGithub
Contributeshare this page and talk about GDQUest onRedditYoutubeTwitter…
Site in BETA!found a bug?